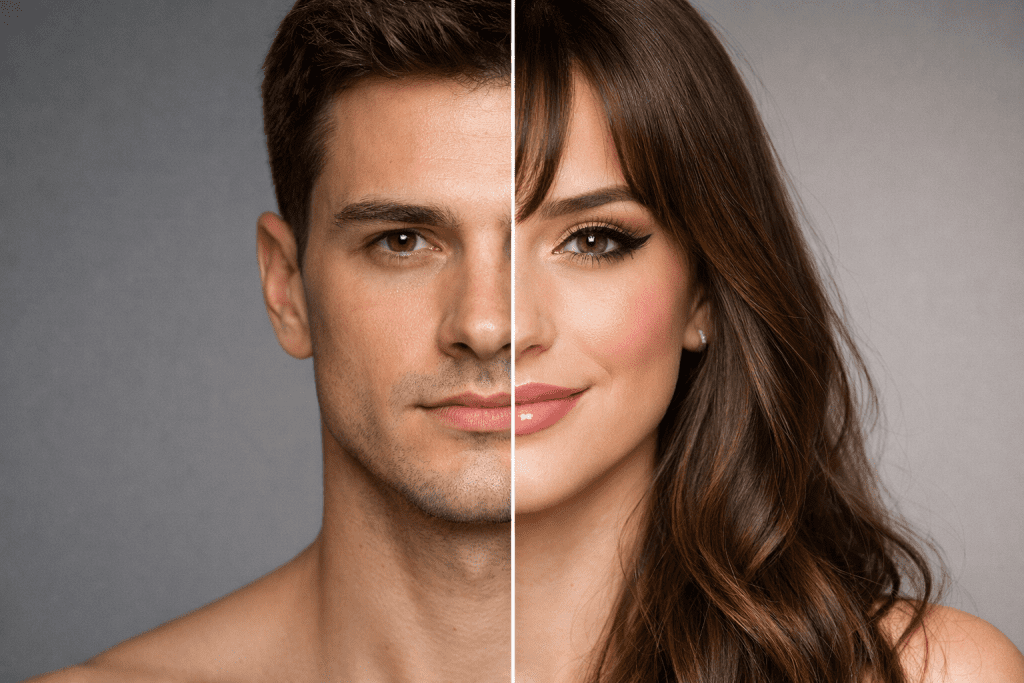
(Male to Female Transformation)
Welcome to Your Transformation, Sweetie Oh my gosh, I am so excited you’re here.!
The Ultimate Sissy Makeup Guide for Beginners(Male to Female Transformation) – Taking that first step into makeup can feel a little scary, right? Maybe your hands are shaking a tiny bit, or you’re worried you won’t get it right. Take a deep breath, sweetie. You are safe here, and we are going to have so much fun! Every girl starts somewhere, and today is the day you start discovering the beautiful, feminine butterfly waiting to come out.
Here’s the tea, darling: watching regular makeup tutorials is great, but they aren’t always made for us. Biological girls don’t usually have to worry about hiding a beard shadow, softening a strong jawline, or reshaping a masculine brow. That’s why this guide is different. It is specifically designed for sissies, crossdressers, and femboys who need those special little tricks to hide the “him” and highlight the “her.”
My goal is simple. I want to help you stop looking in the mirror and seeing a “guy in makeup,” and start seeing the total doll you really are. We’re going to soften your features, make those eyes sparkle, and give you that dreamy, girly glow. By the time we’re done, you won’t just look prettier, you’ll feel softer, lighter, and so much more confident.
Are you ready to meet the new you? Grab your mirror, princess. Let’s get started!
Phase 1: The Perfect Canvas (Skin Prep & Beard Cover)
Okay, lovely! Before we touch any fun colors, we have to prep that beautiful face of yours. Think of your face like a smooth, blank canvas, if the canvas is rough or bumpy, the painting won’t look right. For us girls, this step is the most important part of the transformation. We are going to erase the masculine texture and hide that stubborn shadow so the world only sees her.
Step 1: The Closest Shave of Your Life First things first: that stubble has got to go! We want your skin to feel as smooth as a baby’s bottom.
- Take your time: Hop in a hot shower to soften the hair.
- Go against the grain: Carefully shave against the direction your hair grows to get the closest possible cut. Be gentle, sweetie, we don’t want razor burn!
- Feel the difference: Run your fingers over your jaw. If you feel any prickles, go over it again. We want glass-smooth skin.
Step 2: Drink Up! (Moisturize) Male skin tends to be a little rougher, so we need to soften it up big time. Slather on a nice, rich moisturizer. Massage it in circles, it feels so nice, right? This makes your skin plump and dewy so the makeup glides on instead of looking dry or cakey. Give it a minute to soak in while you admire yourself in the mirror.
Step 3: The Magic Trick (Hiding the Shadow) Here is the secret weapon that biological girls don’t know about, but every sissy needs to master: Color Correction. Even with a close shave, you might see a faint grey or blue “shadow” under the skin where the beard grows. If we put foundation right over that, it will just look grey and muddy. Yuck!
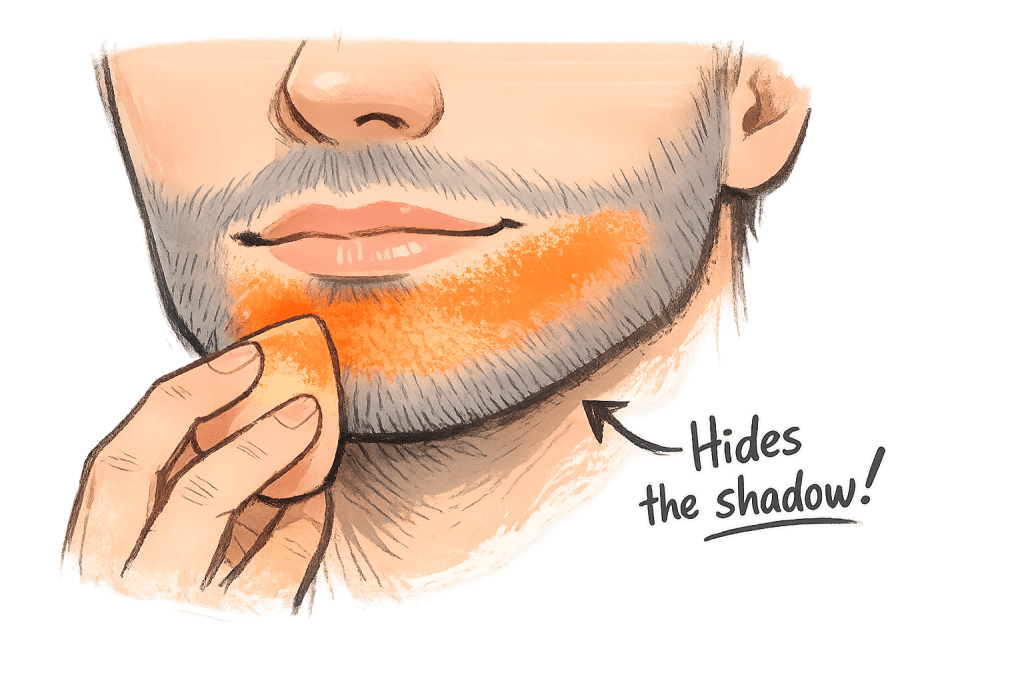
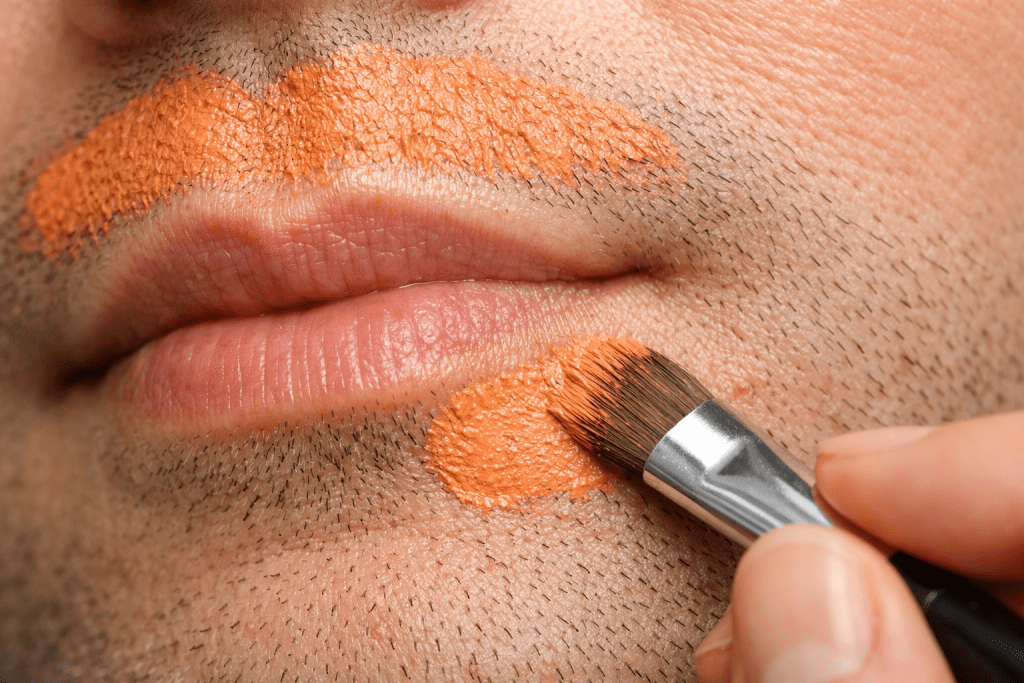
- The Science: Orange cancels out blue!
- What to use: Get an orange or peach color corrector (orange for darker hair/skin, peach for lighter hair/skin).
- How to apply: Dab the orange corrector only where you see beard shadow (usually the upper lip, chin, and jaw). Don’t put it all over your face!
- Blend it: Use your finger or a sponge to tap it into the skin until the shadow disappears. You might look a little crazy with an orange mouth right now, but trust the process, doll!
Step 4: Prime Time Last step before the foundation! Apply a smoothing primer all over your face. This fills in any large pores (which guys tend to have more of) and creates a silky barrier. It helps your makeup stick to your face so you stay looking fresh and pretty for hours.
There! Touch your face now. Smooth, prepped, and ready for magic.
Phase 2: Building Your Base (Foundation & Concealer)
Okay, gorgeous, this is where the real magic starts to happen! We’ve prepped your skin, and now we’re going to give you that flawless, airbrushed complexion that every girl dreams of. Say goodbye to stubble and hello to porcelain perfection!
Step 1: Finding Your True Match Here’s a rookie mistake a lot of baby sissies make: picking a foundation that matches their face but forgets their neck! Since men’s faces can sometimes be a little redder or darker from shaving or sun exposure, you want to match your foundation to your neck or chest.
- Why? If your face is a different color than your body, it looks like you’re wearing a mask. And we want you to look like a natural beauty, right?
- The Goal: We want a seamless transition. When in doubt, go slightly warmer or lighter to brighten up your look, but keep it close to your natural skin tone.
Step 2: Coverage is Queen For us girls, a full-coverage liquid foundation is your best friend. We aren’t just evening out skin tone; we are hiding that stubborn beard shadow we just color-corrected!
- Don’t Wipe, Tap! This is super important, sweetie! Do not drag or swipe the foundation across your face. If you wipe, you’ll smear that orange corrector right off, and the shadow will peek through.
- The Technique: Pour some foundation on the back of your hand (like a pro MUA!). Dip a damp beauty sponge into it and gently bounce or press the foundation onto your skin. Tap, tap, tap! It takes a little longer, but it locks everything in place perfectly.
Step 3: The Brightening Hack (Concealer) Now that your skin looks even, let’s add some light! We use concealer not just to hide blemishes, but to highlight. This brings attention to the center of your face and away from masculine edges like a wide jaw.
- Pick a shade: Choose a concealer that is 1-2 shades lighter than your foundation.
- Where to put it: Draw an upside-down triangle under each eye (pointing down towards your cheek). Put a little dab in the center of your forehead, down the bridge of your nose, and on your chin.
- Blend it out: Use your damp sponge to bounce-blend these lighter areas until they melt into your foundation.
Step 4: Look at That Glow! Take a second to look in the mirror. See how the center of your face looks bright and awake? See how that beard shadow is totally gone? You’re already looking so much softer and more feminine. You’re doing amazing, doll!
Phase 3: Softening the Edges (Contour & Blush)
The Objective: To manipulate light and shadow. You are not just adding color; you are optically receding the areas you want to “hide” (angles, width) and bringing forward the areas you want to emphasize (cheek fullness).
1. The Map of Shadows (Contouring)
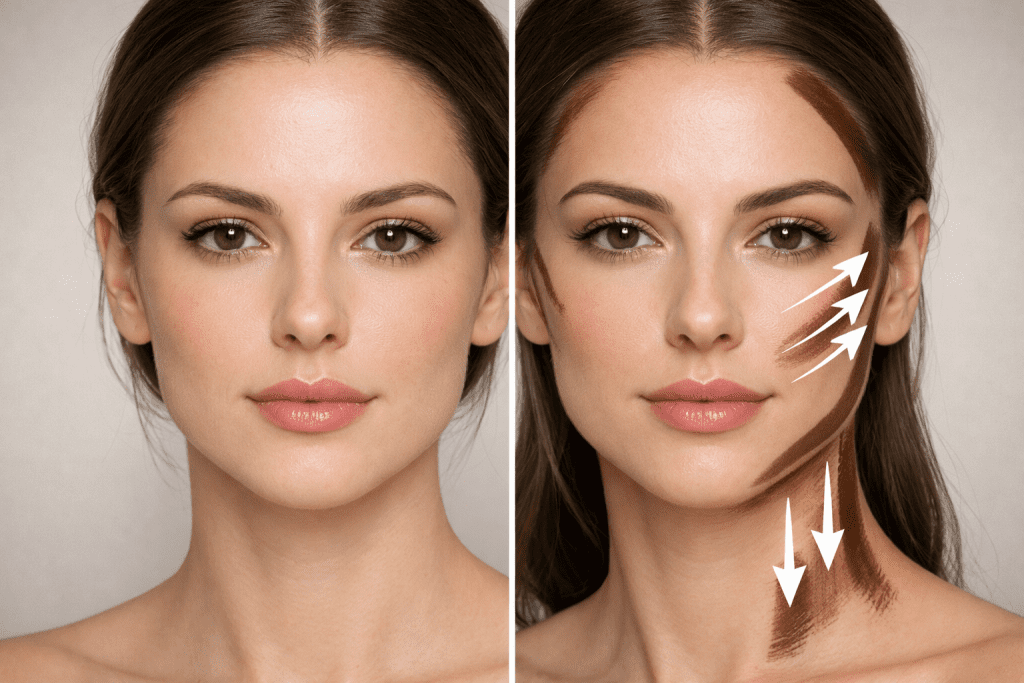
Contouring is the most powerful tool for reshaping bone structure. For this phase, use a matte powder or cream that is 1-2 shades darker than your foundation. Avoid shimmers here; shadows do not sparkle.
- The Jawline: Start behind the ear and trace the contour product along the very edge of the jawbone. As you reach the chin, blend the color downward onto the neck. This camouflages the sharp edge of the jaw and blends the face into the neck, minimizing the appearance of a wider jaw.
- The Forehead: If you wish to shorten or round the hairline, apply contour in an arch shape along the temples and top of the hairline. Blend thoroughly into the hair roots to avoid a visible stripe.
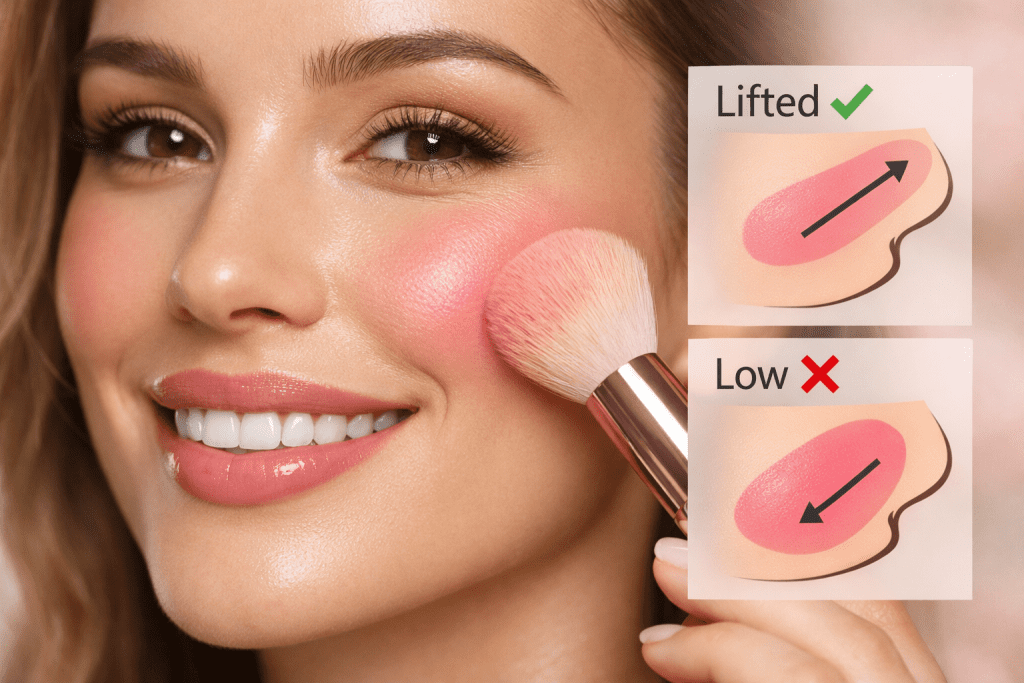
- The Cheekbones: Instead of a sharp, harsh line (which can look severe), aim for a soft shadow right beneath the cheekbone. Start at the hairline (near the top of the ear) and stop halfway to the mouth. Blend upward to lift the face, never downward, which can drag the features.
- The Nose: To slim the nose, draw two thin, parallel lines down the bridge, stopping just before the tip. A small “V” shape under the tip can shorten the appearance of the nose.
2. Adding Life and Volume (Blush)
Blush softens the sculpted look of the contour and adds the illusion of fullness and “plumpness” to the skin.
- Placement: Smile to find the “apples” of your cheeks (the roundest part). Apply the blush here and sweep it gently back toward the temples.
- The Effect: Focusing the color on the apples creates a rounder, more youthful appearance. Avoid applying blush too low (below the nose line), as this can visually pull the face down.
- Texture: A satin or slight shimmer blush can diffuse light, adding to the “soft focus” effect.
3. The Great Blend
The difference between “painted” and “polished” is blending.
- Tools: Use a clean, fluffy brush or a damp beauty sponge.
- Technique: Go over the edges where your contour meets your foundation, and where your blush meets your contour. There should be no hard lines, only seamless gradients of shadow and color.
- Check: Look at your face in natural light if possible to ensure the jawline contour isn’t visible as a dark stripe on the neck.
Quick Checklist for Phase 3
- [ ] Jawline: Shadow blended downward to soften the edge.
- [ ] Cheeks: Contour is lifted; blush is focused on the apples.
- [ ] Forehead: Temples shaded to round out the face shape.
- [ ] Blend: No visible stripes or harsh demarcations.
Phase 4: The Eyes (Brows, Liner, & Lashes)
The Objective: To maximize the “white space” of the eye and lift the features. You are moving away from deep-set or heavy brows toward an open, fluttery, and defined look.
1. The Frame (Eyebrows)
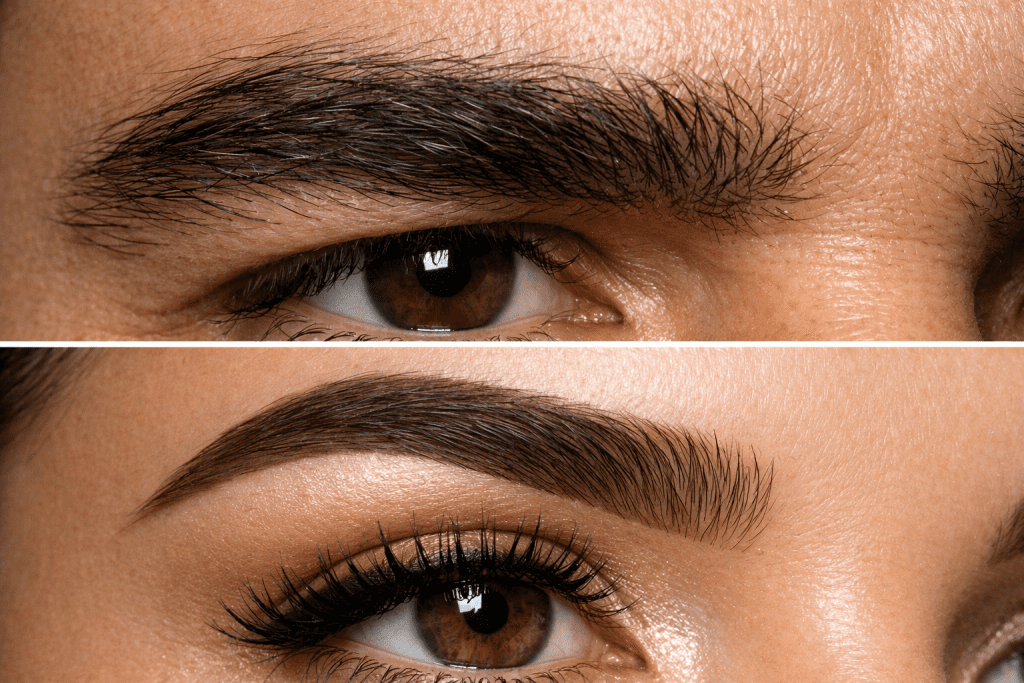
Brows set the expression of the face. A lower, straighter brow reads as masculine; a higher, arched brow reads as feminine.
- Cleanup: Pluck or shave stray hairs from underneath the brow to create more space between the brow and the eyelid. This instantly lifts the face.
- The Arch: When filling in brows, focus on creating a subtle peak or arch just above the outer third of the eye.
- The Tail: extend the tail of the brow slightly outward and upward toward the temple, rather than dragging it down.
- Technique: Use a brow pencil or powder that is one shade lighter than your natural hair color. Avoid solid, blocky lines. Use short, feathery strokes to mimic hair.
2. The Canvas (Eyeshadow)
Shadow is used to reshape the eye socket.
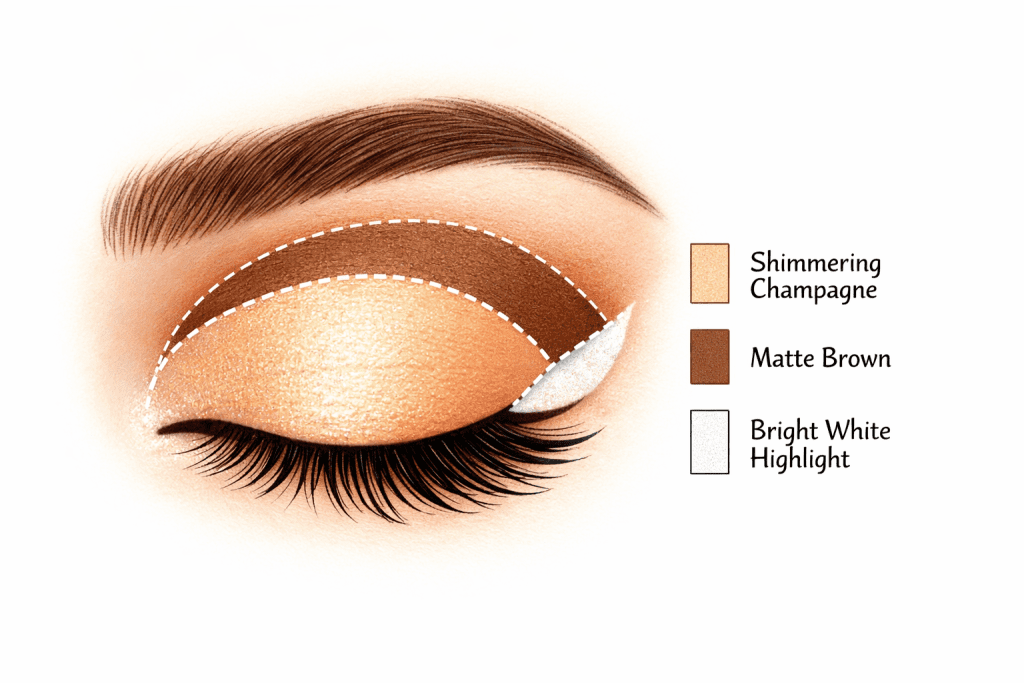
- The Lid: Apply a light, shimmering shade (champagne, light pink, or pearl) across the entire mobile lid. This catches the light and makes the lid appear larger.
- The Crease: Use a matte medium-brown shade in the crease (the fold above the lid). Blend this color slightly above your natural crease to create the illusion of a deeper, larger eye socket.
- The Inner Corner: A dot of highlighter or white pencil in the inner corner (tear duct) instantly brightens the eyes and makes you look more awake.
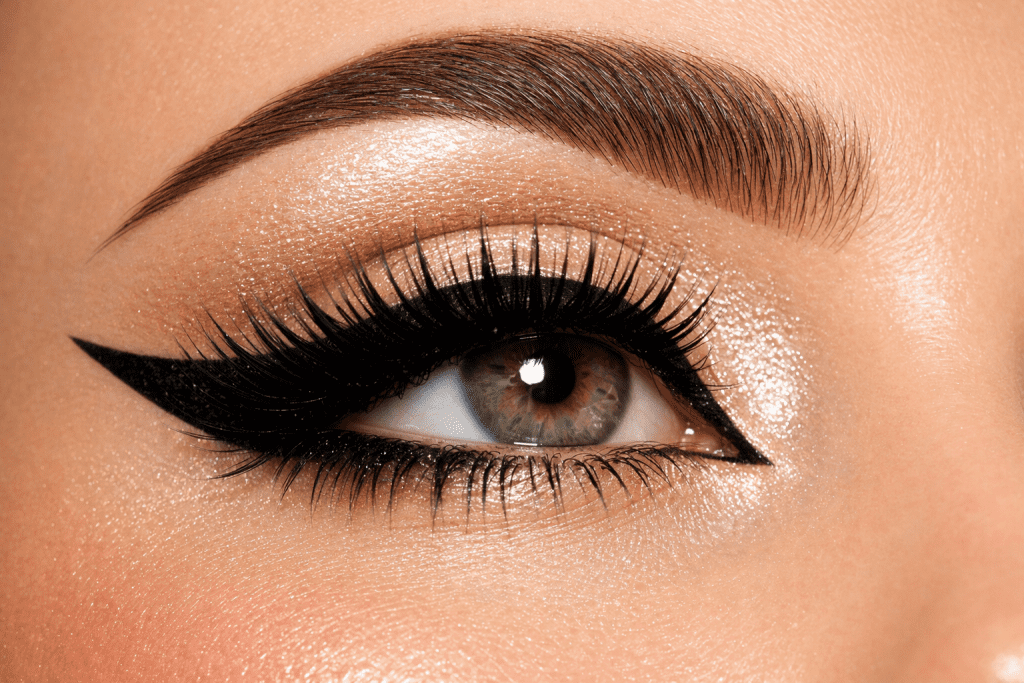
3. The Definition (Eyeliner)
Liner defines the lash line, but thick, heavy liner can close the eye up.
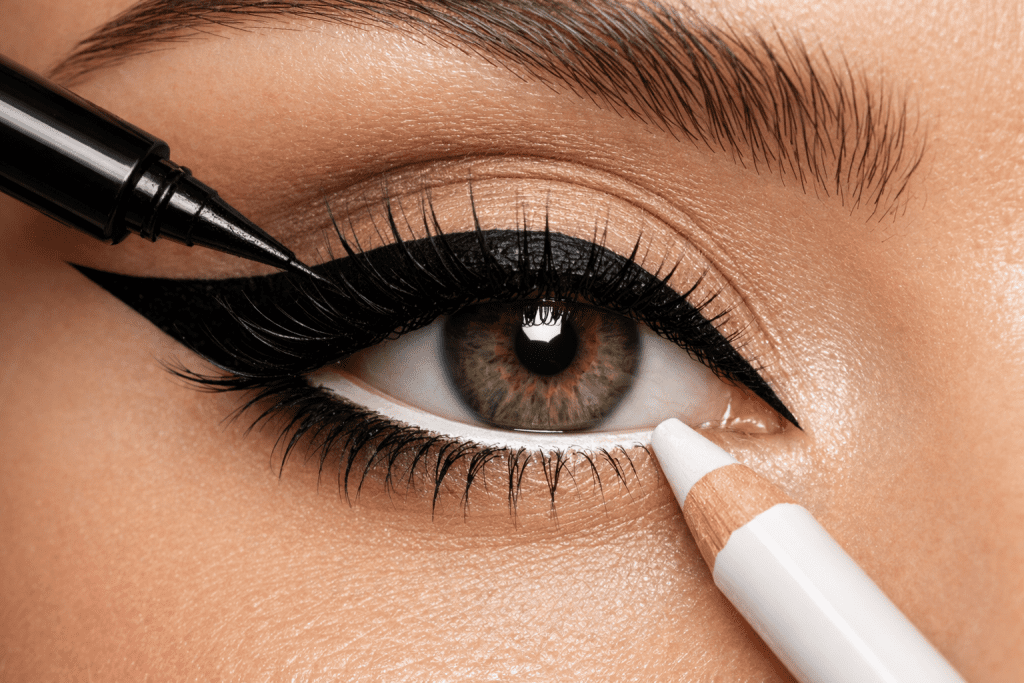
- The Style: A “winged” liner or “cat eye” is ideal. It extends the eye shape outward and upward.
- The Technique: Start thin at the inner corner and thicken the line as you move outward. Flick the line up toward the end of your brow.
- The Waterline: Avoid black liner on the bottom waterline (the inner rim), as this shrinks the eye. Instead, use a nude or white pencil there to make the whites of your eyes look bigger.
4. The Finish (Lashes)
Long, curled lashes are a universal signifier of femininity.
- Curl First: Always use an eyelash curler before applying mascara. Hold the curl for 10 seconds.
- Mascara: Apply 2-3 coats, focusing on the outer corners to fan the lashes out.
- False Lashes (Optional but Recommended): If you are comfortable, a pair of natural wispy lashes (or just “half lashes” on the outer corners) adds a level of polish that mascara alone cannot achieve.
Quick Checklist for Phase 4
- [ ] Brows: Cleaned up from underneath and slightly arched.
- [ ] Lid: Light/shimmer shade applied to the center.
- [ ] Crease: Matte shadow blended slightly above the natural fold.
- [ ] Liner: Winged upward; bottom waterline kept bright/nude.
- [ ] Lashes: Curled and coated (or falsies applied).
Phase 5: The Lips (Shape, Plumping, & Color)
The Objective: To manipulate the lip shape to appear fuller and more symmetrical. The goal is a soft, plush look rather than a thin or severe line.
1. The Prep (Exfoliation & Moisture)
Dry, chapped lips ruin the illusion of softness.
- Smooth: Gently scrub your lips with a damp washcloth or a sugar scrub to remove dead skin.
- Hydrate: Apply a lip balm immediately after scrubbing. Let it sit for a few minutes, then blot off the excess before applying color.
2. The Outline (Lip Liner)
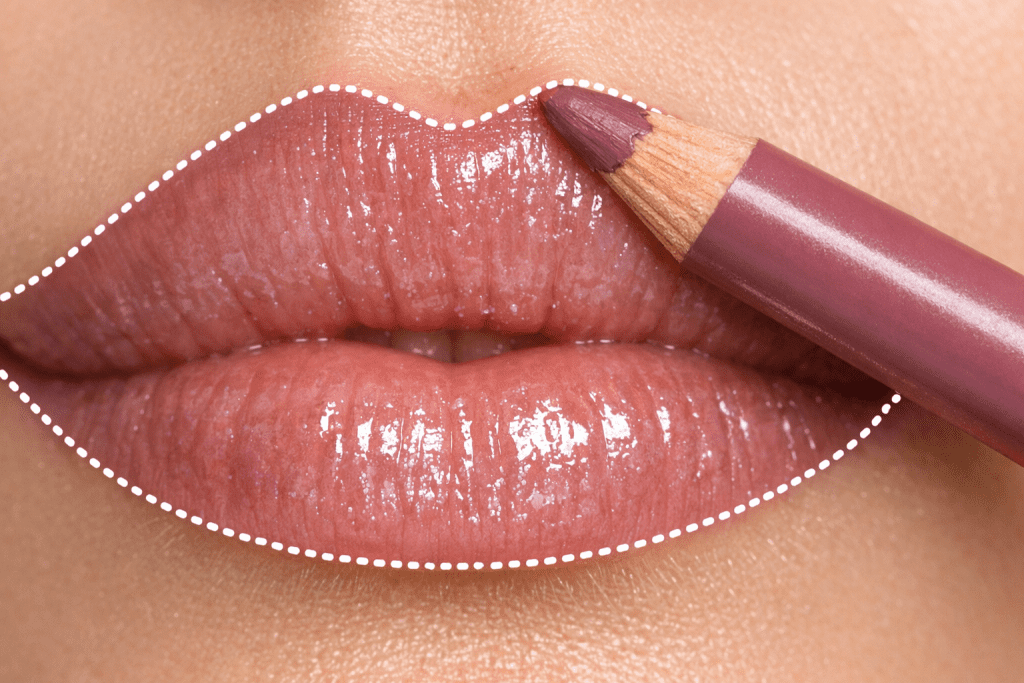
Liner is the architect of the lip. It defines the boundaries and prevents color from bleeding.
- Color Choice: Choose a liner that is one shade darker than your natural lip color or the lipstick you plan to use.
- Overlining (Subtle): To create fullness, trace slightly outside your natural lip line, particularly on the Cupid’s bow (the “M” shape of the top lip) and the center of the bottom lip.
- The Corners: Taper the liner back into your natural lip line as you reach the corners of the mouth. This prevents a “clownish” look.
3. The Fill (Lipstick)
- Application: Apply lipstick directly from the bullet or use a lip brush for precision.
- Blending: Press your lips together gently to distribute the color.
- Correction: If you make a mistake or the line looks uneven, use a flat brush with a tiny bit of concealer to “erase” the error and crisp up the edge.
4. The Dimension (Gloss & Highlight)
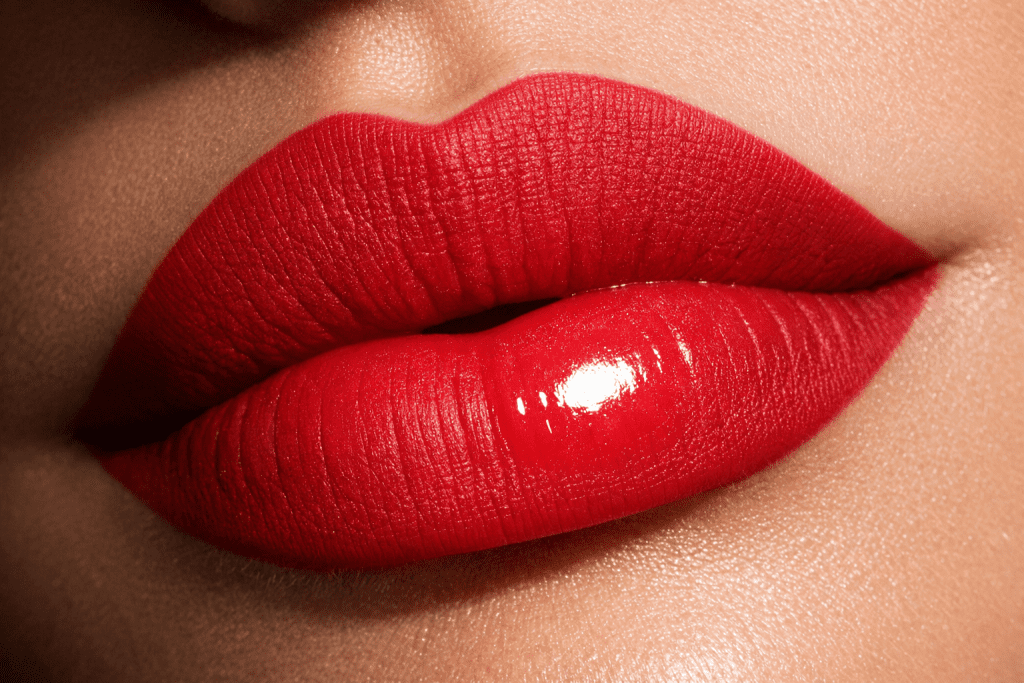
Matte lips can sometimes look flat or shrink the appearance of the mouth. Gloss adds volume.
- The Center: Dab a clear or shimmery gloss only in the center of the top and bottom lips. This reflects light and creates a 3D “pouty” effect.
- Cupid’s Bow: A tiny dot of highlighter right on the Cupid’s bow emphasizes the shape and lifts the top lip.
Quick Checklist for Phase 5
- [ ] Smooth: Lips are exfoliated and moisturized.
- [ ] Liner: Slightly overlined at the center, tapering to the corners.
- [ ] Color: Applied evenly within the lines.
- [ ] Gloss: Dabbed in the center for volume.
- [ ] Cleanup: Edges sharpened with concealer if needed.
Phase 6: The Finishing Touches (Setting & Hair)
The Objective: To ensure longevity (no melting or smudging) and to use hair to camouflage any remaining masculine features (like a high forehead or square jaw) while creating a cohesive, feminine aesthetic.
1. The Seal (Setting Spray & Powder)
Makeup needs to “set” or it will slide off, especially under wig caps or synthetic hair.
- Powder (The T-Zone): lightly dust translucent powder over your forehead, nose, and chin. This prevents shine, which can read as sweaty or oily rather than glowing.
- Spray (The Melt): Use a setting spray (like Urban Decay All Nighter or similar) in an “X” and “T” motion across the face. This melts the powder into the foundation, removing the “cakey” texture and making it look like real skin.
2. The Frame (Hair & Wigs)

Hair is the ultimate contour tool. It hides the hairline, softens the jaw, and covers the neck.
- Wigs: If using a wig, a style with bangs (fringe) is the easiest way to hide a masculine hairline and soften the forehead.
- Placement: Pull the wig forward enough to cover your natural hairline but not so low that it shortens your face unnaturally. Secure it with bobby pins or a wig grip band to prevent slipping.
- Styling: Brush the hair forward around the temples and jawline. “Curtain bangs” or face-framing layers are excellent for hiding the width of a jaw.
- Volume: Flat hair emphasizes a large head shape. Tease the roots slightly or choose a wig with some volume at the crown to balance facial proportions.
3. The Neck & Chest (The Blend)
A common mistake is a perfectly painted face sitting on top of a neck that is a different color or texture.
- Foundation Extension: Drag your foundation down past the jawline, onto the neck, and even onto the collarbones if they are exposed.
- Bronzer: Dust bronzer on the sides of the neck to make it appear thinner.
4. The Final “Check”
Take a selfie with flash. Flash photography reveals unblended makeup or “flashback” (white cast from SPF or powder).
- Check: Is the jawline blended? Are the lashes lifting? Is the lip liner even?
Quick Checklist for Phase 6
- [ ] Set: T-zone powdered; face misted with setting spray.
- [ ] Hair: Wig secured; hairline hidden; layers framing the jaw.
- [ ] Neck: Makeup blended down to the collarbone.
- [ ] Photo Test: No harsh lines or white cast in flash photos.
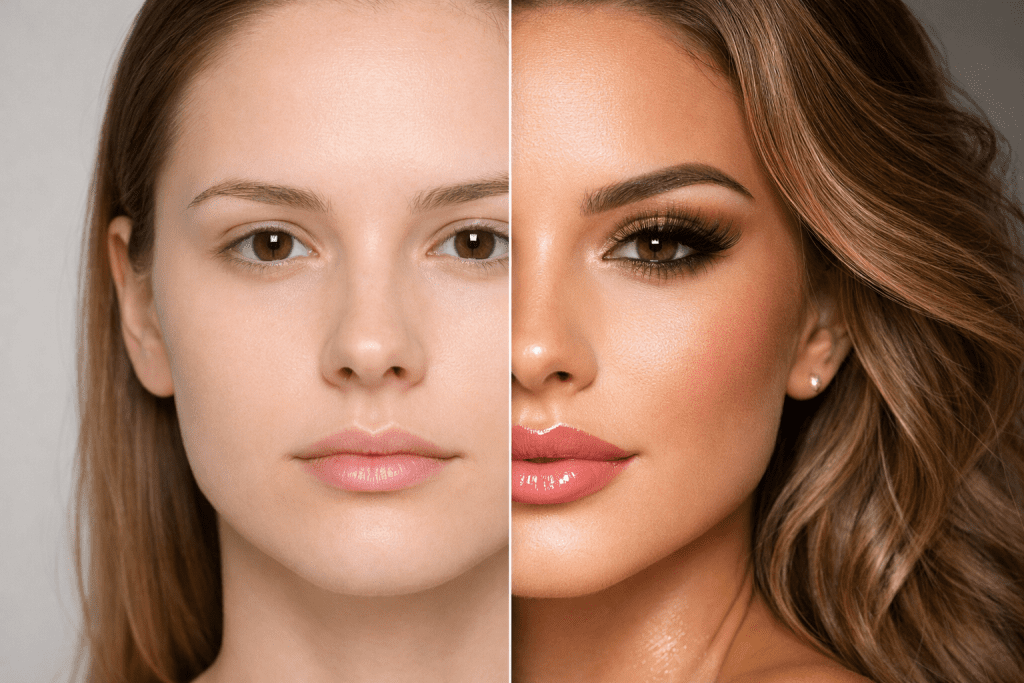
Conclusion of the Makeup Module
You have now completed the facial transformation. You have prepped the canvas, hidden the shadow, sculpted the bone structure, opened the eyes, plumped the lips, and framed the face.
🎃💖 The Ultimate 60-Day Sissy Transformation
Step into your softest, most obedient self with 200+ guided assignments, rituals, and printable challenges designed to gently reshape your mindset, habits, and femininity… day by day.
👠 Get the Bundle NowWhere would you like to go next?
- Option A: Wardrobe & Styling (choosing clothes to create curves and hide broad shoulders).
- Option B: Body Shaping (padding, cinching, and creating a feminine silhouette).
- Option C: Posing & Mannerisms (how to move and sit to sell the illusion).
Take one last look in that mirror, blow yourself a kiss, and remember: you are beautiful.
FAQs
Q: How do I find my foundation shade without going into a store? A: Look at the veins on your wrist! If they look green, you have warm undertones (choose “golden” or “honey” shades). If they look blue, you’re cool-toned (choose “rose” or “pink” shades). When in doubt, “neutral” is usually a safe bet!
Q: Can I skip the color corrector if my beard is thin? A: Even with a thin beard, a little peach corrector helps. It brightens the area and prevents that “dull” look. If you don’t have one, a tiny bit of creamy orange-pink lipstick blended well can work in a pinch!
Q: My makeup looks “cakey.” What am I doing wrong? A: You’re likely using too much product or skipping moisturizer. Always prep with lotion first, and remember: it’s easier to add more makeup than to take it off. Use a damp sponge to blend everything out.
Q: How do I hide my thick eyebrows without shaving them? A: Use a clear brow gel to brush them upward and outward into a neat arch. You can also use a bit of concealer just under the brow bone to “lift” the arch and make them look thinner and more feminine.
Q: How long does it take to get “good” at this? A: It’s all about muscle memory, sweetheart! Give yourself 15 minutes of “playtime” a few nights a week. Within a month, you’ll be able to do your basic feminization routine in under 10 minutes.
Q: Is it okay to feel nervous the first time? A: Absolutely! Every girl you admire felt those same butterflies her first time. Take a deep breath, put on some girlie music, and remember, it’s just makeup, and it washes off. Have fun with it!